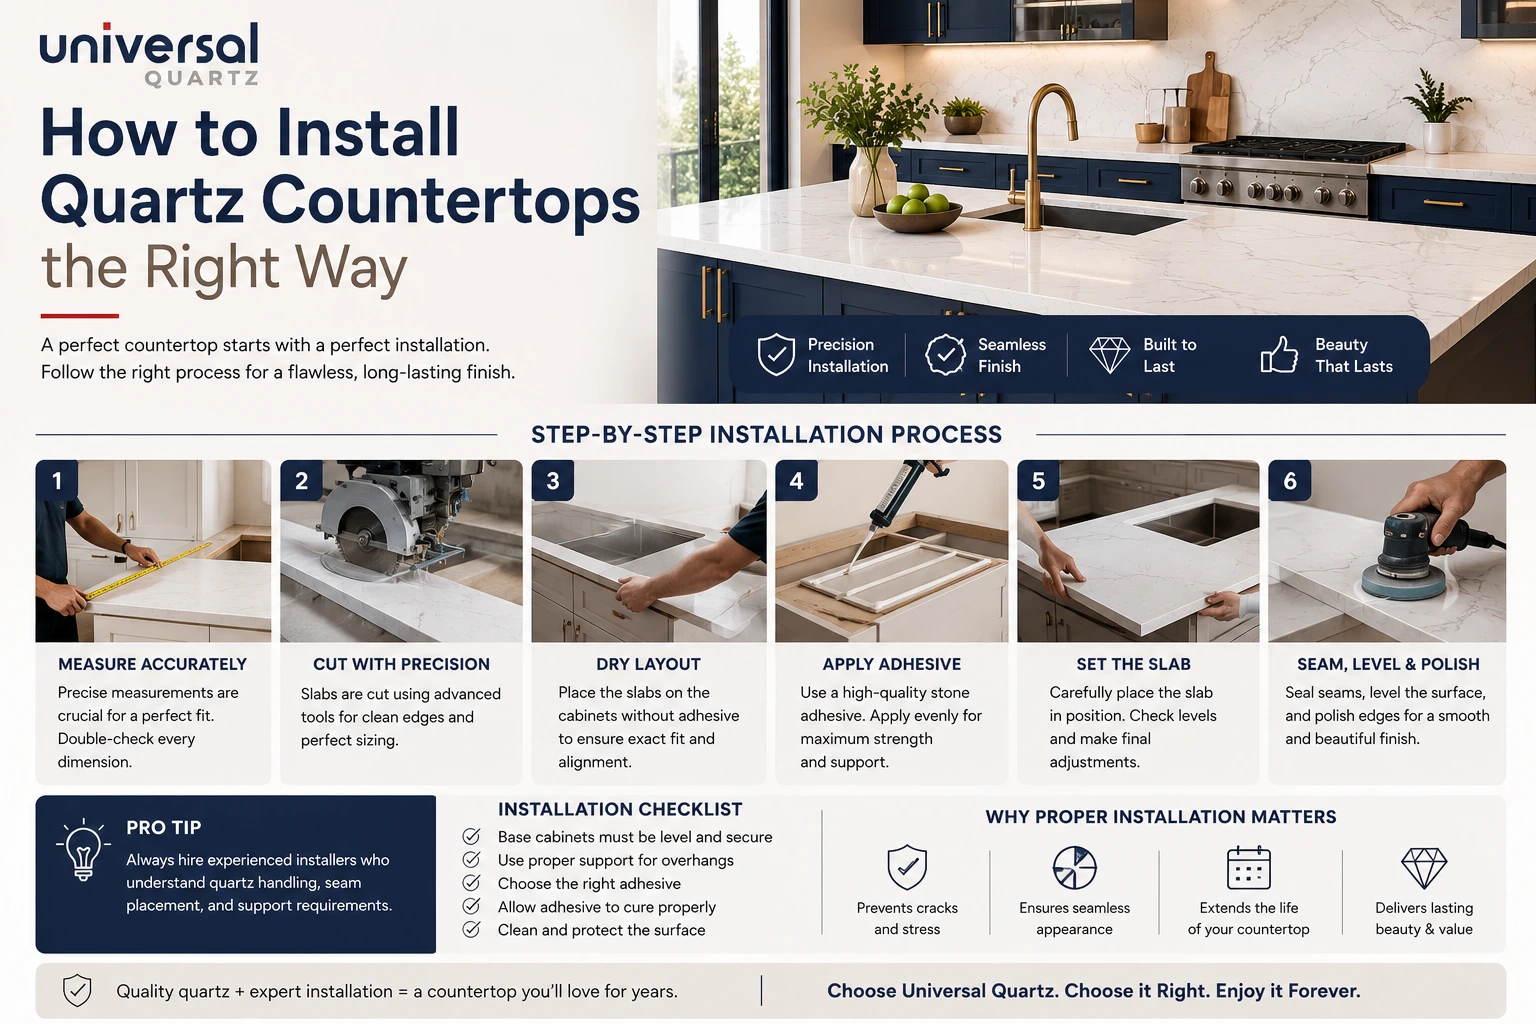
Quartz countertops have earned their place as one of the most sought-after surfaces for kitchens and bathrooms. They offer the beauty of natural stone with the strength and consistency of an engineered material — resisting stains, scratches, and heat far better than laminate, and requiring none of the sealing maintenance that granite or marble demand.
But even the highest-quality quartz slab can fall short of expectations if it isn’t installed correctly. Uneven seams, cracked edges, gaps near the sink, or a wobbly overhang can turn a premium material into a daily frustration. In this comprehensive guide, we’ll walk through every stage of quartz countertop installation, the tools and considerations involved, common mistakes to avoid, and answer the most frequently asked questions homeowners have before starting a project.
Why Quartz Countertops Are So Popular
Before diving into installation, it helps to understand why quartz has become a go-to choice:
- Durability – Engineered from roughly 90–95% crushed quartz crystals bound with resin, it’s harder and more chip-resistant than many natural stones.
- Non-porous surface – Unlike granite or marble, quartz doesn’t need periodic sealing and resists bacteria growth.
- Consistent patterns – Because it’s manufactured, quartz offers uniform colour and veining, unlike natural stone where every slab varies.
- Low maintenance – Daily cleaning with mild soap and water is usually all it needs.
- Wide design range – From marble-look veining to solid modern tones, there’s a quartz style for nearly every design vision.
These benefits make quartz an investment worth protecting with a proper installation process.
Step-by-Step: The Quartz Countertop Installation Process
1. Site Visit and Precise Measurement
Every good installation begins with an in-person site visit. A technician measures the cabinet layout, checks wall straightness, and notes the position of sinks, cooktops, and outlets. Many companies now use digital laser templating for millimetre-level accuracy, capturing curves, angles, and cutout locations that a tape measure alone might miss.
Why this matters: Quartz slabs are cut to exact specifications at the factory or fabrication shop. Any measurement error at this stage becomes a costly (and sometimes irreversible) problem later.
2. Slab Selection and Edge Profile
With measurements locked in, you’ll choose your slab colour, pattern, and thickness (commonly 2 cm or 3 cm), along with an edge profile:
| Edge Style | Look | Best For |
|---|---|---|
| Straight/Square | Clean, minimal | Modern kitchens |
| Bullnose | Soft, rounded | Family homes, safety-conscious spaces |
| Bevelled | Subtle angled cut | Transitional styles |
| Ogee | Decorative curve | Classic or traditional interiors |
| Waterfall edge | Slab wraps down the side | Islands, statement pieces |
3. Fabrication and Cutting
Using the template, the fabricator cuts the slab with computer-guided saws (CNC machines) for precision. Sink cutouts, cooktop openings, and outlet notches are cut at this stage. Edges are then shaped and polished according to the chosen profile.
4. Preparing the Cabinet Base
On installation day, the existing cabinet tops are checked and prepared:
- Old countertops (if any) are removed
- Cabinet frames are checked for level and structural soundness
- Plywood or additional support is added under areas with overhangs, such as islands or breakfast bars
- The surface is cleaned of dust and debris
A stable, level base is critical — quartz is strong but not flexible, and stress points from an uneven base can eventually cause cracking.
5. Dry Fit Before Anything Is Fixed
Installers place the cut quartz pieces onto the cabinets without adhesive first. This dry fit confirms:
- Seams align neatly (for larger countertops made of multiple slabs)
- Cutouts match sink, cooktop, and outlet positions exactly
- The overall fit is flush against walls and cabinetry
Adjustments — however minor — are far easier to make now than after the adhesive cures.
6. Setting the Slab with Adhesive
Once approved, the countertop is set using a construction-grade adhesive or silicone applied to the cabinet tops. For countertops requiring more than one slab, a colour-matched epoxy resin joins the seams, which is then sanded and polished so the seam is as close to invisible as possible.
7. Sink and Cooktop Integration
For undermount sinks, mounting clips and silicone sealant secure the sink beneath the countertop from below, creating a smooth, lip-free transition. Cooktop cutouts are also sealed at the edges to prevent moisture or crumbs from getting trapped.
8. Sealing the Perimeter
While the quartz surface itself doesn’t need sealing, the edges where the countertop meets the wall, backsplash, or cabinets are caulked with a matching silicone sealant. This keeps water from seeping into gaps and causing damage underneath.
9. Final Cleaning, Polish, and Inspection
The last step involves removing any excess adhesive or sealant, buffing the surface, and doing a full walkthrough to check:
- Seam visibility and strength
- Edge finishing and smoothness
- Sink and cooktop fit
- Overall levelness
A reputable installer will also explain basic care instructions and warranty details before wrapping up.
Installation Timeline: What to Expect
| Stage | Typical Duration |
|---|---|
| Site visit & templating | 1 day |
| Fabrication (cutting & polishing) | 5–10 business days |
| Installation | 1 day (occasionally 2 for large kitchens) |
| Sealant curing | 24–48 hours before heavy use |
Total project time from first measurement to a fully usable countertop is usually 1–2 weeks, depending on slab availability and design complexity.
Common Installation Mistakes to Avoid
- Skipping professional templating – Estimating measurements yourself often leads to poor-fitting slabs and wasted material.
- Installing on an uneven cabinet base – Creates hidden stress points that can crack the quartz months later.
- DIY seam joining without proper tools – Seams need precise epoxy work and polishing; a mismatched or rough seam is hard to fix afterward.
- Rushing to use the countertop – Using the surface (especially near the sink) before sealant fully cures can compromise the seal.
- Ignoring overhang support requirements – Islands and breakfast bars need corbels or brackets beyond a certain overhang length, or the slab risks cracking under weight.
- Choosing the wrong thickness for the application – Thinner slabs (2 cm) usually need plywood backing, while 3 cm slabs are more self-supporting.
DIY vs. Professional Installation
Quartz is heavier and less forgiving than laminate, and it requires diamond-tipped tools for cutting, along with experience in seam and edge finishing. While a confident DIYer might manage a small, single-slab bathroom vanity, kitchen countertops with sink cutouts, seams, and overhangs are best left to professionals. Professional installation also typically comes with a workmanship warranty, protecting you if something goes wrong down the line — something a DIY job won’t offer.
Caring for Your Quartz Countertop After Installation
- Wipe spills promptly, especially acidic substances like wine, coffee, or citrus juice
- Use mild soap and warm water for daily cleaning
- Avoid abrasive scouring pads or highly alkaline/acidic cleaners
- Use trivets or hot pads — quartz resists heat well but sudden extreme temperature changes can still cause damage
- Avoid cutting directly on the surface; use a cutting board to protect the resin-based finish
Frequently Asked Questions (FAQs)
1. How long does quartz countertop installation take?
Installation itself usually takes a single day for a standard kitchen, though larger or more complex layouts may take two days. The full process — including templating and fabrication — typically spans 1–2 weeks from start to finish.
2. Can quartz countertops be installed over existing countertops?
It’s generally not recommended. Removing the old countertop allows installers to properly check and level the cabinet base, which is essential for a stable, long-lasting installation.
3. Do quartz countertops need sealing?
No. Quartz is non-porous due to its resin content, so it doesn’t require sealing like granite or marble. Only the edges and seams are sealed with silicone during installation.
4. How much overhang can quartz support without additional bracing?
As a general guideline, unsupported overhangs beyond 6–10 inches (depending on slab thickness) typically require corbels or metal brackets underneath for support. Your fabricator will assess this based on your specific design.
5. Will there be visible seams in my countertop?
For larger kitchens, seams are often unavoidable since standard slabs have size limits. However, skilled fabricators use colour-matched epoxy and precise polishing to make seams minimally visible. Seam placement is usually planned away from high-visibility areas like the sink front.
6. Can I use my kitchen immediately after installation?
It’s best to avoid heavy use, especially around the sink, for 24–48 hours to allow the sealant to fully cure.
7. How do I know if my cabinets can support quartz?
Most standard kitchen cabinets can support quartz countertops, but installers check for level surfaces and structural soundness during the pre-installation prep. Weak or uneven cabinets may need reinforcement before installation.
8. What’s the difference between 2 cm and 3 cm quartz slabs?
3 cm slabs are thicker, more substantial-looking, and often self-supporting with less need for plywood backing. 2 cm slabs are lighter and more budget-friendly but usually require a plywood substrate for extra support.
9. Can quartz countertops crack during or after installation?
Cracking is uncommon with professional installation but can happen due to an uneven base, excessive unsupported overhang, or heavy impact. Choosing an experienced installer significantly reduces this risk.
10. How do I maintain the look of my quartz countertop long-term?
Regular cleaning with mild soap and water, avoiding harsh chemicals, using cutting boards, and wiping spills promptly will keep your quartz countertop looking new for years.
11. Is professional installation covered by warranty? Most reputable fabricators and installers, including Universal Quartz, offer a workmanship warranty covering installation defects. Always confirm warranty terms before your project begins.
Final Thoughts
A quartz countertop is a long-term investment in both function and style, but its performance depends heavily on how well it’s installed. From precise templating to careful seam work and proper sealing, every step plays a role in how the final surface looks and lasts.
Planning a quartz countertop installation? At Universal Quartz, our experienced team manages the entire process — from templating to final polish — ensuring a flawless, long-lasting finish for your home. Get in touch with us today to discuss your project and get a free quote.